In my free time, I enjoy exploring and analyzing embedded devices to understand how their ROM works. Recently, I focused on a Cortex-M7 MCU with a 300MHz clock speed, specifically the (previously Atmel) SAM MCUs series. These well-documented MCUs offer a range of features, from general-purpose functions to security capabilities. However, I found the documentation lacking when it came to the “Security Bit Protection” feature, so I decided to dive deeper and document my findings for others.
How SAM MCU works
The SAM E70/S70/V70/V71 series embeds an internal ROM for the SAM Boot Assistant (SAM-BA), which is always mapped at address 0x0080 0000. The internal Flash, used for user applications, is mapped at address 0x0040 0000. On SAM MCU there’s Enhanced Embedded Flash Controller (EEFC) which includes many things one of them is general-purpose NVM bits (GPNVM). The MCU uses the GPNVM bit[1] to determine whether to run the ROM (SAM-BA) or the user application by mapping its content at address 0x0000 0000.
So…
- SAM-BA: A bootloader protocol used by SAM products, documented in the “SAM-BA Boot Program.”
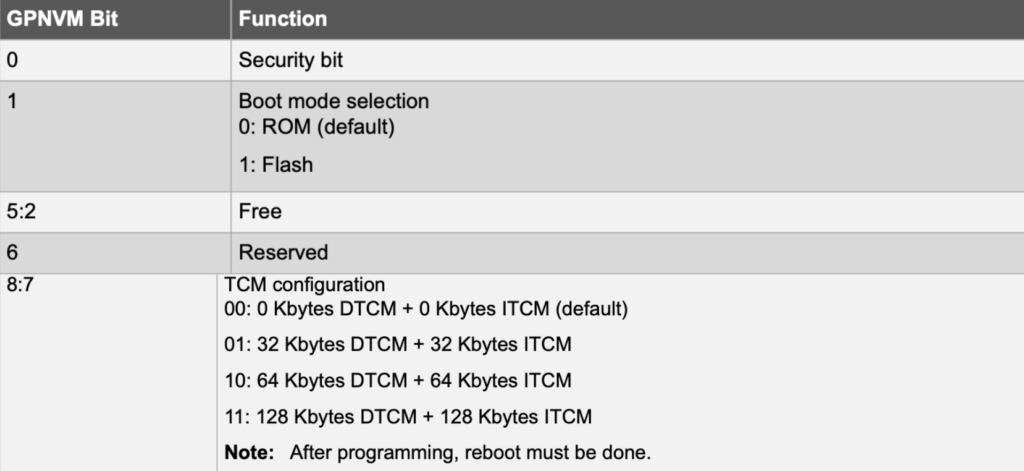
- GPNVM: SAM E70/S70/V70/V71 devices feature nine general-purpose NVM (GPNVM) bits that can be set or cleared through specific EEFC commands. Bit 1 determines whether the MCU runs the ROM code (0x00800000) or the user application (0x00400000) at startup. GPNVM bits are part of EEFC as described in “Enhanced Embedded Flash Controller (EEFC)” chapter.
Security Bit Feature
The SAM E70/S70/V70/V71 series features a security bit based on GPNVM bit 0. When enabled, this bit blocks any access to the Flash, SRAM, core registers, and internal peripherals through interfaces like SW-DP, ETM, and Fast Flash Programming. This ensures the confidentiality of the code in the Flash. Disabling the security bit requires asserting the ERASE pin and performing a full Flash erase.
Erase Pin

In other words GPNVM bits is not a fused configuration, and the only way to reuse the MCU after setting security bit is to perform full erase by hardware or by implementing software trigger in your app as mentioned in Part1.
Okay…. Let’s go to its Flash controller (EEFC)!
Enhanced Embedded Flash Controller (EEFC)
The Enhanced Embedded Flash Controller (EEFC) provides the interface of the Flash block with the 32-bit internal bus. It’s documented in datasheet but to make it more simpler, let’s assume we want to update the user app content at address 0x0040 0000, the sequence will be:
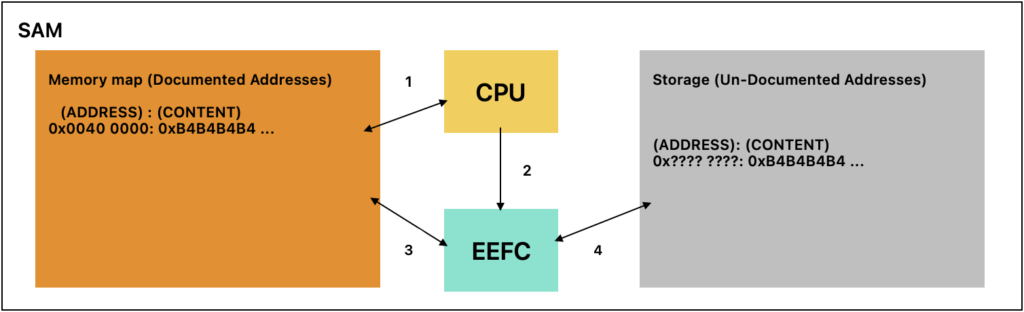
- Write content to the documented address (0x0040 0000)
- Request EEFC to update user application
- & 4. EEFC reads the content from mapped memory and stores it to an internal Flash address. ( the addresses known to EEFC)
And in case we want to read the user app:
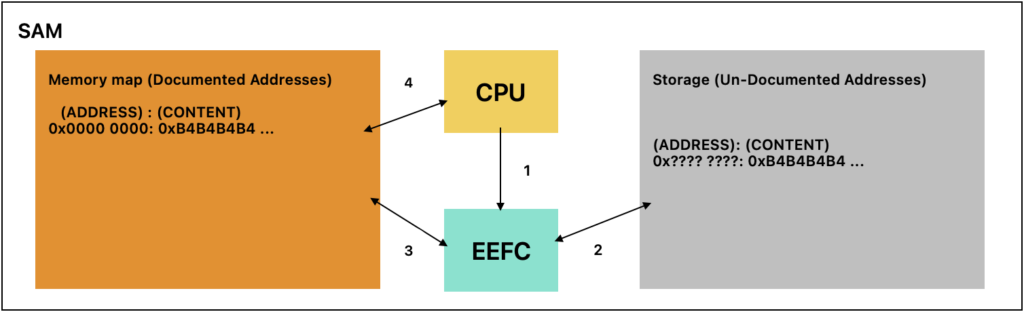
- Request EEFC to map user app
- EEFC will read the user app from unknown address (only known to EEFC)
- Map the data to 0x0040 0000
- CPU can access user application
Same thing for other, such as writing/reading from [QSPI] is out the flash it is a peripheral at it’s own, reading unique identifier…
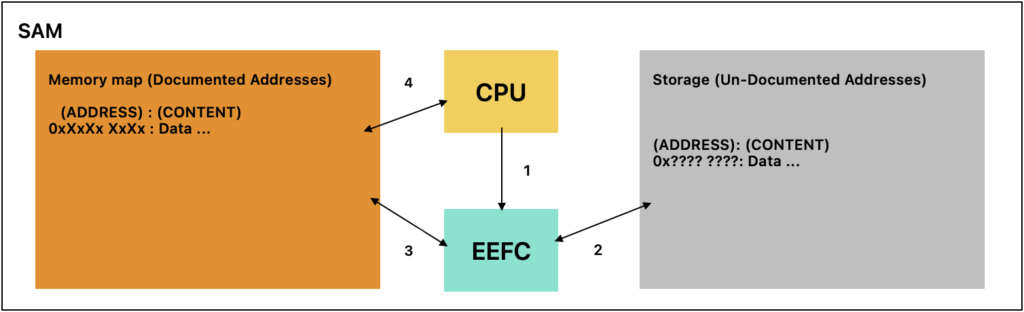
- CPU requesting EEFC for data by using EEFC command
- EEFC will read the data from a page
- EEFC command will map it to known address
- CPU can access this data
Simple 🙂
Now we have better understanding how SAM will start its application at address 0x0000 0000, it looks follow this:

After power-up usually the BootROM code will be loaded & executed to do the next steps, not sure about its details so I marked as black-box.
- The user configuration including GPNVM bits.
Enough from intros, lets dive in.
SAM memory map:
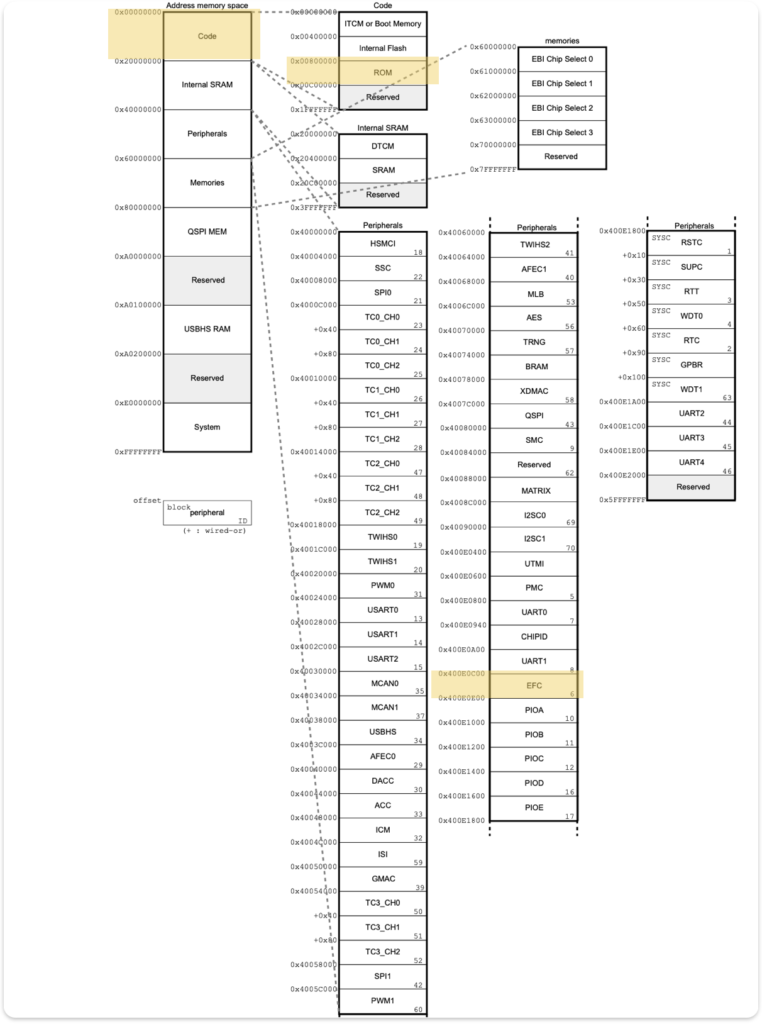
Understanding the memory map of SAMx7x is crucial. The ROM code exists at address 0x00800000, with a peripheral controller for EEFC mapped at address 0x400E0C00. Each peripheral has a starting address and interrupt ID.
Dumping ROM code (SAM-BA-)
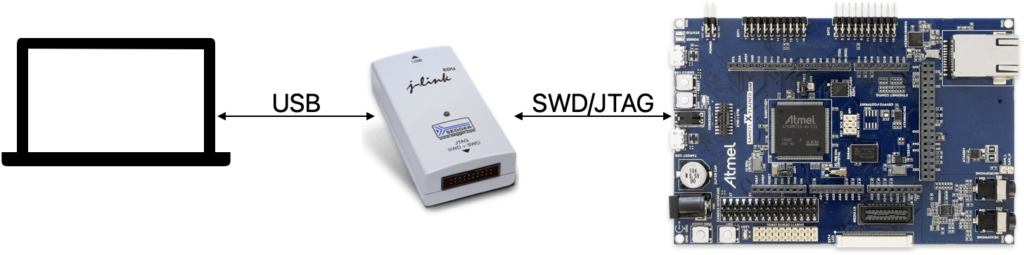
This is our setup to dump ROM code, at first we encountered issues regarding dumping ROM code because any access to wrong memory regions causing SAM to crash and stuck in dummy handler, whenever we try to dump 0x00800000 for size > 0x4000 it will crash, how did we know that —> we wrote a simple code that access the memory starting from 0x0080 0000 and print its addresses:content and saw the last address been accessed.
So we dump only the first 0x4000 (16KB) which turned out it contain the ROM code of SAM duplicated -content(0x0<->0x2000) =content(0x2000<->0x4000)-… maybe for fallback.
To dump the ROM code, we used JLINK and executed the command
> SaveBin ROM.bin 0x00800000 0x4000
Reversing ROM code
We looked for references to the Security Bit or JTAG locking. We found only the SAM-BA protocol implementation.
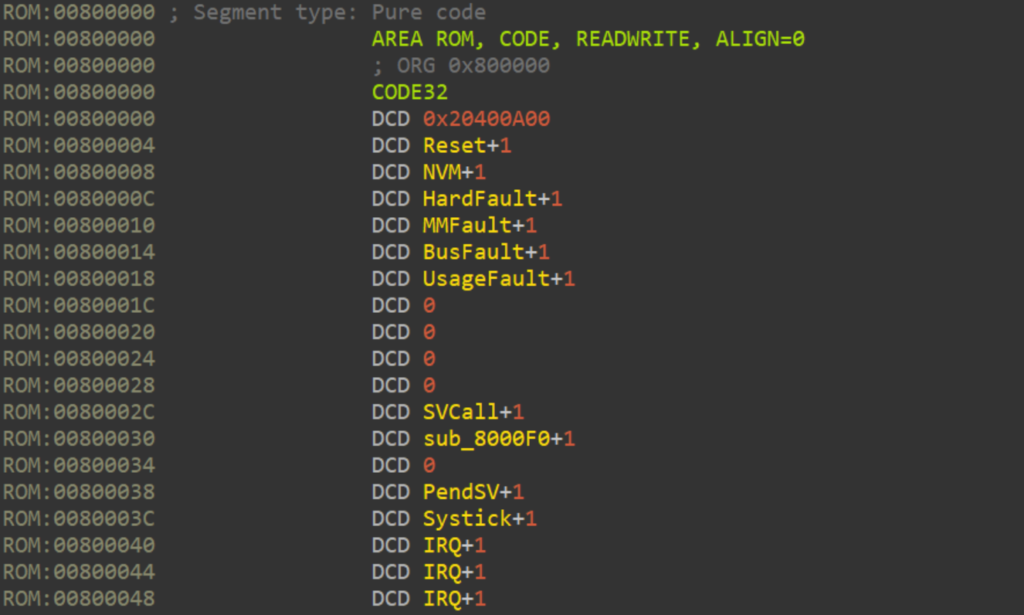
This is the vector table of ROM code.
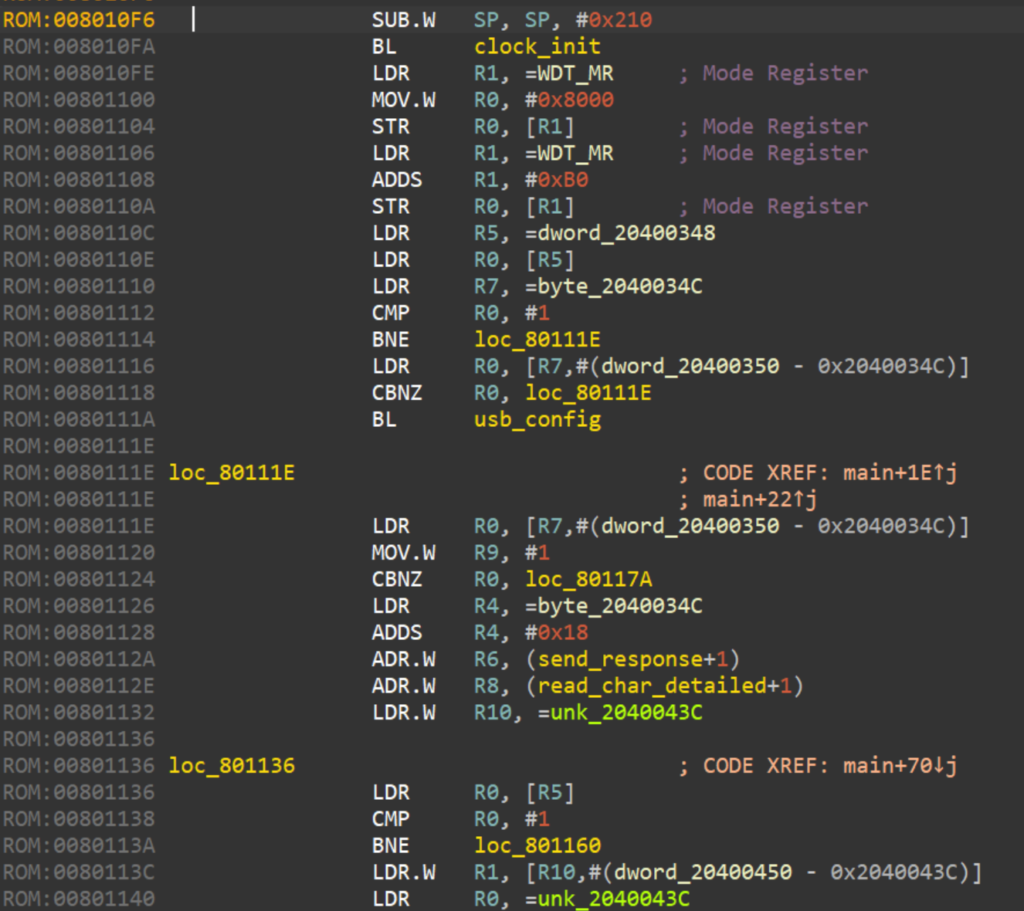
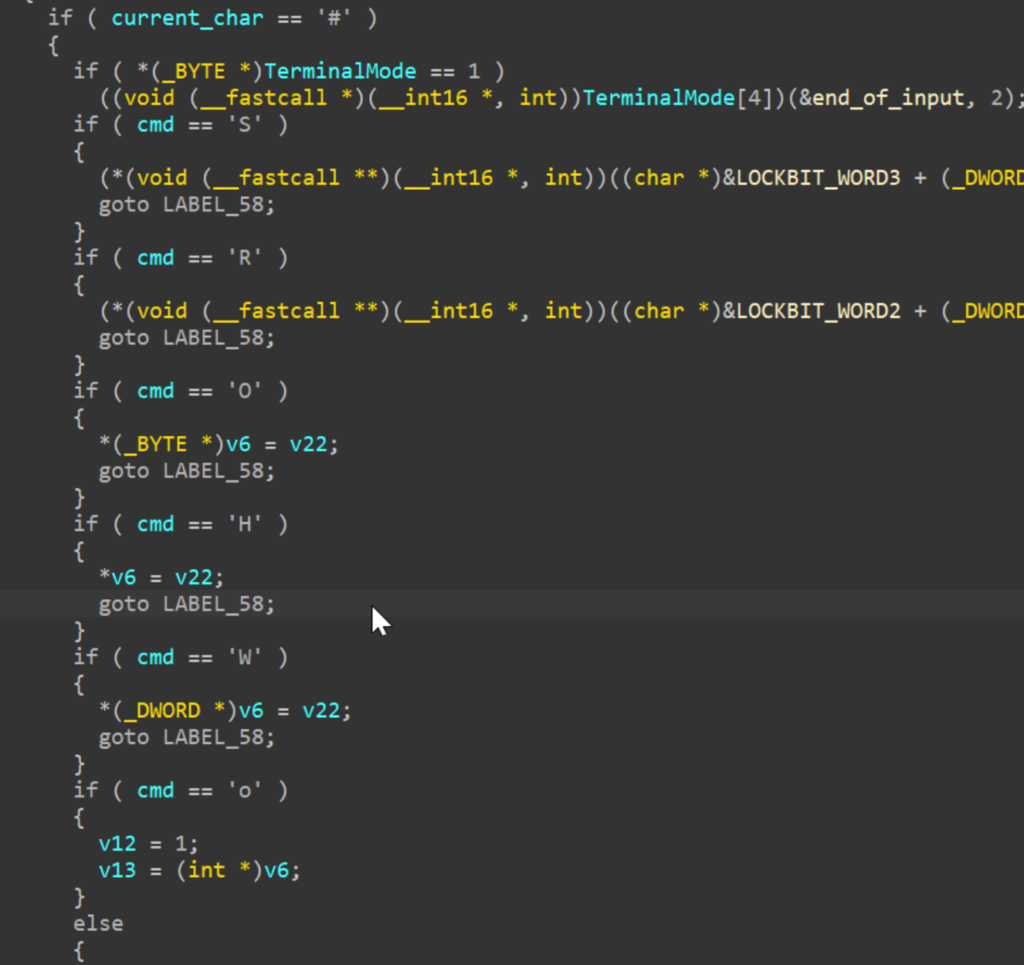
This is the main function of ROM code, we only found the SAM-BA protocol implementation, as shown in the next screenshot. So it appears reading security bit and make decision regarding the JTAG locking is not related to ROM section in memory map.
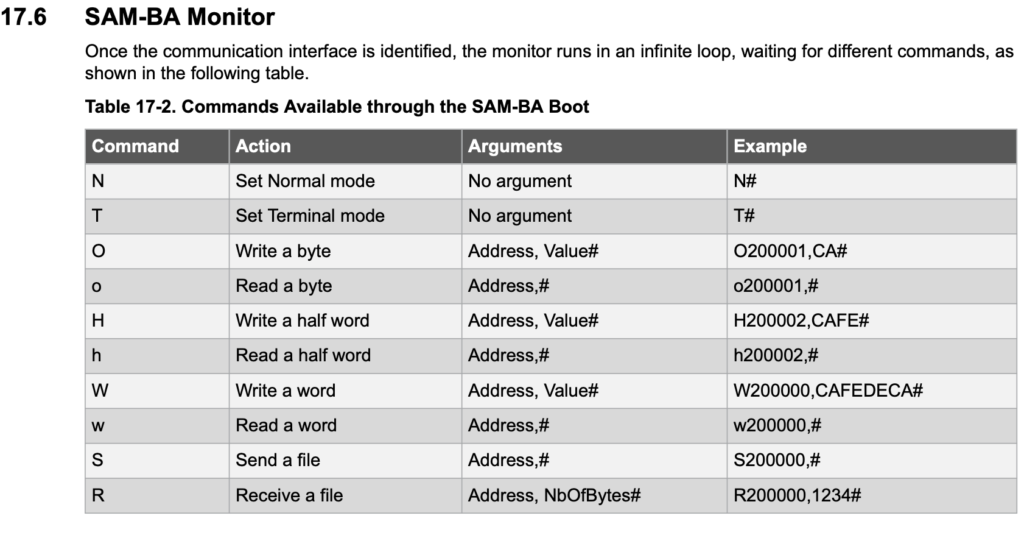
And this is the SAM-BA commands as mentioned in the datasheet
Wait a second… this is not fun, let’s fully emulate it for the following reasons:
- Dynamic debugging keep disconnecting when we tried to access some region of memory, and too slow when try to understanding the exact flow for certain SAM-BA commands.
- Cannot fuzz the protocol and examine its behavior in an easy way
- Try to mimic and understand how EEFC it works!
- There was no ready emulator for a cortex-M7 like other architecture
- Have a fun by learning new things which is the most obvious reason 😐
I started looking and trying existing emulators… and found out the most suitable emulator will be Qiling Project:
- Written in python
- Support STM MCU (cortex-M3/M4)
- Integrate AFL/gdb debugger/IDA plugin/…
- Active on Telegram channel
And other features that can be found on their github (https://github.com/qilingframework/qiling), unfortunately nothing is perfect … they have 0% documentation for MCU part :|, but it’s in python so we can read the source code to understand it

Emulating ROM code
The approach:
1- Emulate simple example —> (getting-started) with minimal feature such as loop and send message through UART1/USART1 (ex1)
2- Emulate UART0 loop-back example (send to UART0/ receive from UART0) (ex2)
3- Emulate ROM (rom)
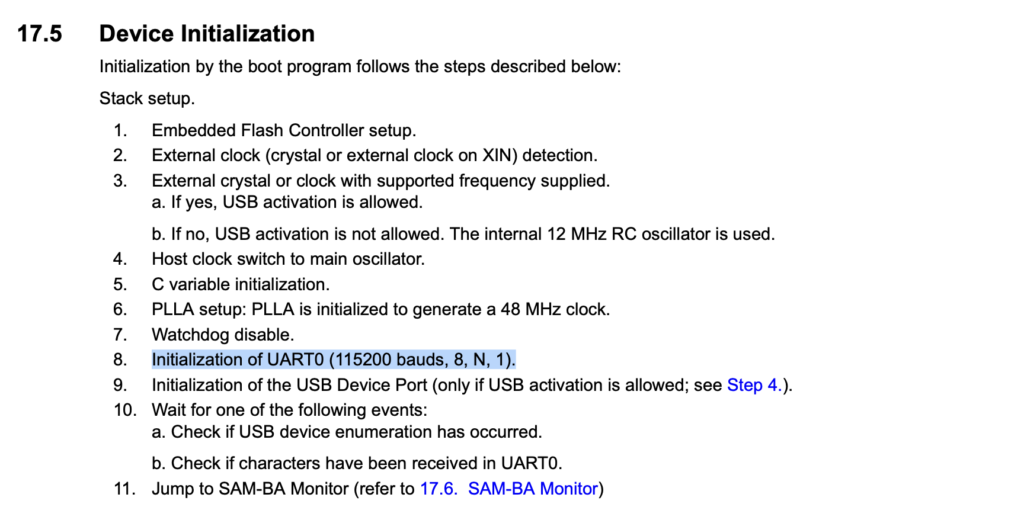
ROM code will use the UART0 as an interface:
Let say it wasn’t straightforward… debugging and tracing things, debugging registers in bit level, finding and hooking ASF delay function to mimic the delay operation, …
Long story short we were able to fully emulate it and create a magic patch 🙂 to add all files that needed to do it.
* You need to install the Qiling requirements and afl-fuzz (https://aflplus.plus/)
Patch file: https://github.com/0xB4x/SAME70Emulator
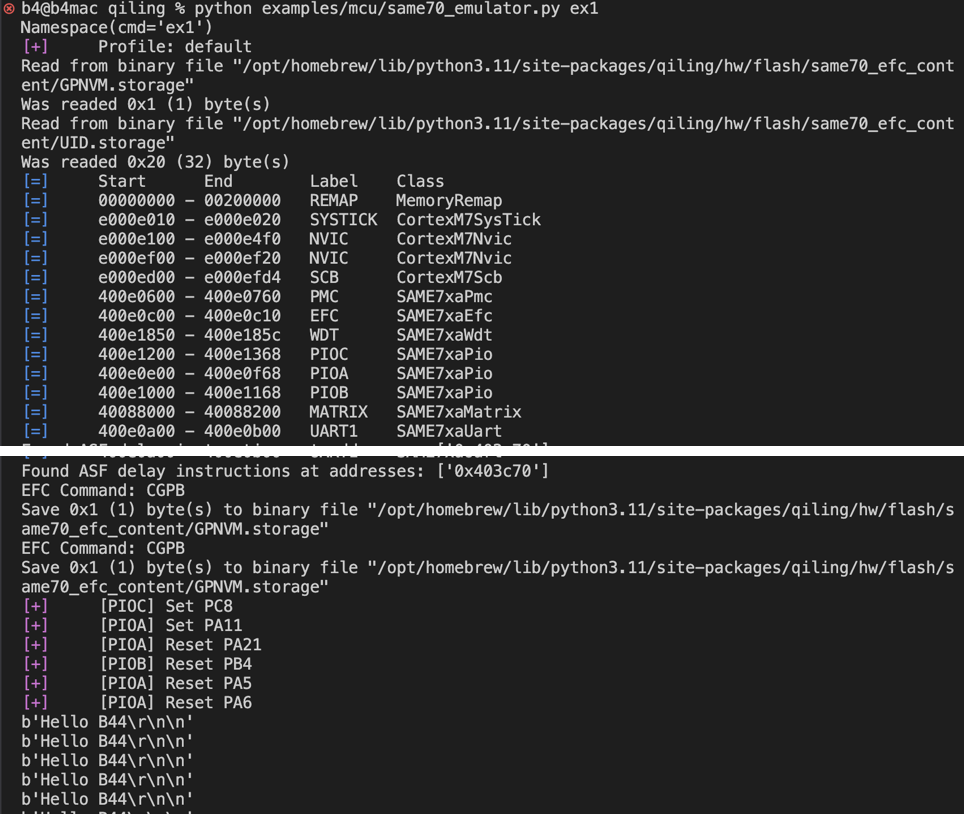
Emulate example1
ROM emulation tips:
- SAM Emulator will be able to communicate directly with UART0 in Terminal mode by default or you can switch to Normal mode

- Adding [-s] in command line will use SAM-BA client tool from (https://github.com/abcminiuser/sam-ba-loader), I integrated with the emulator for the ease of use
- I implement EFC as there is a directory mimic the storage of SAM stored in the
[PYTHON_PATH]/site-packages/qiling/hw/flash/same70_efc_content/, currently I added only 2 files- GPNVM.storage —> contain the 9bits of GPNVM
- UID.storage —> contain the Unique SN

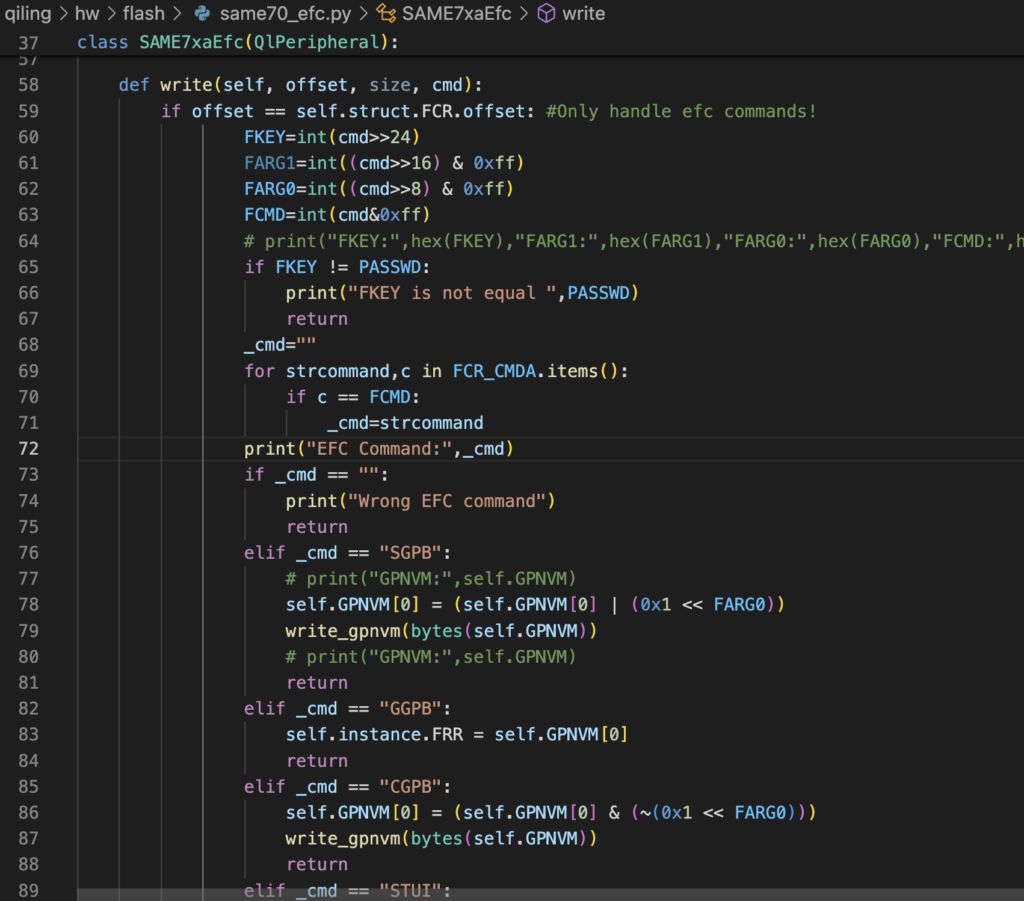
There are many EFC commands:

I’ve implemented what makes the ROM code works properly, screenshot below shows where you can modify the implementation.
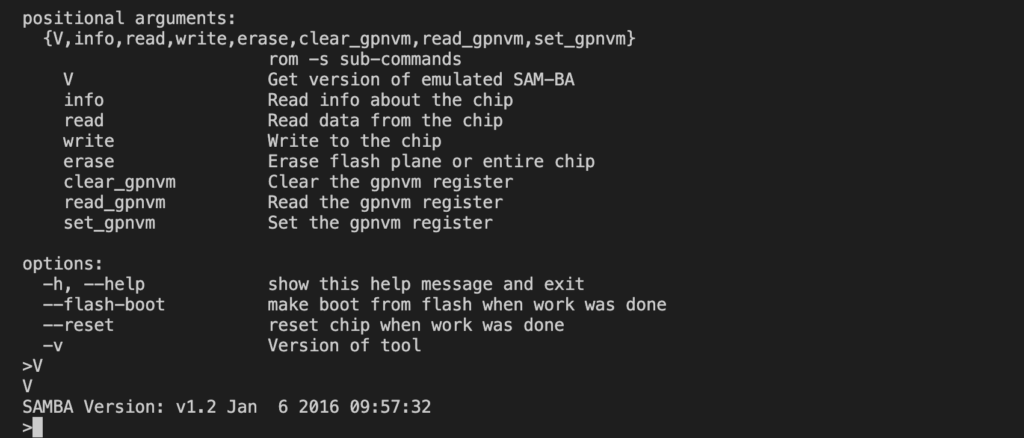
Screenshots for the SAM-BA client:
- Get the version of emulated ROM code
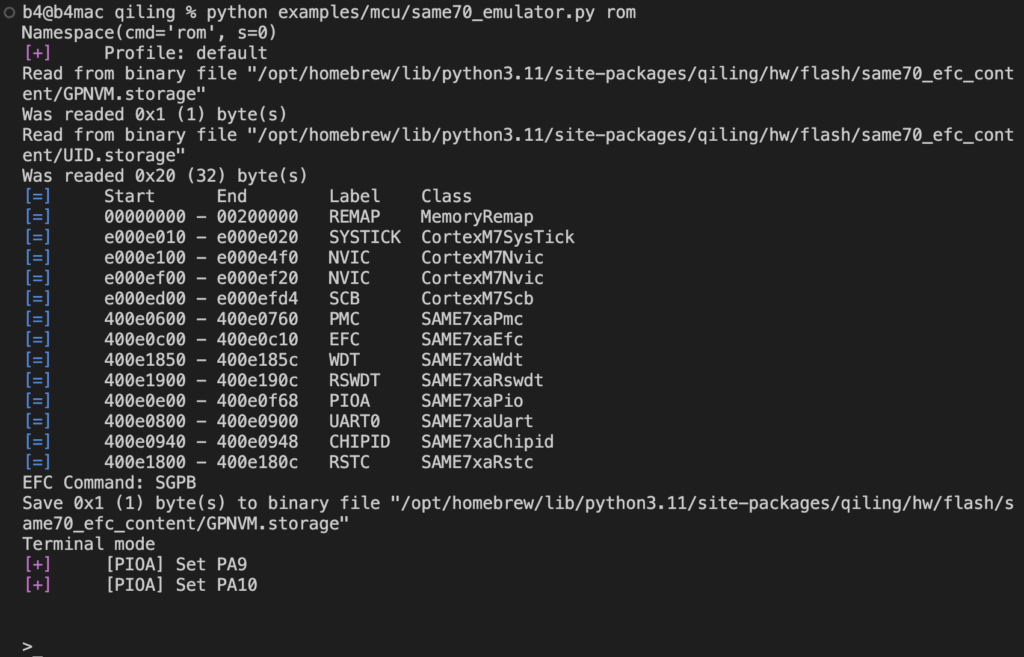
- Read GPNVM command

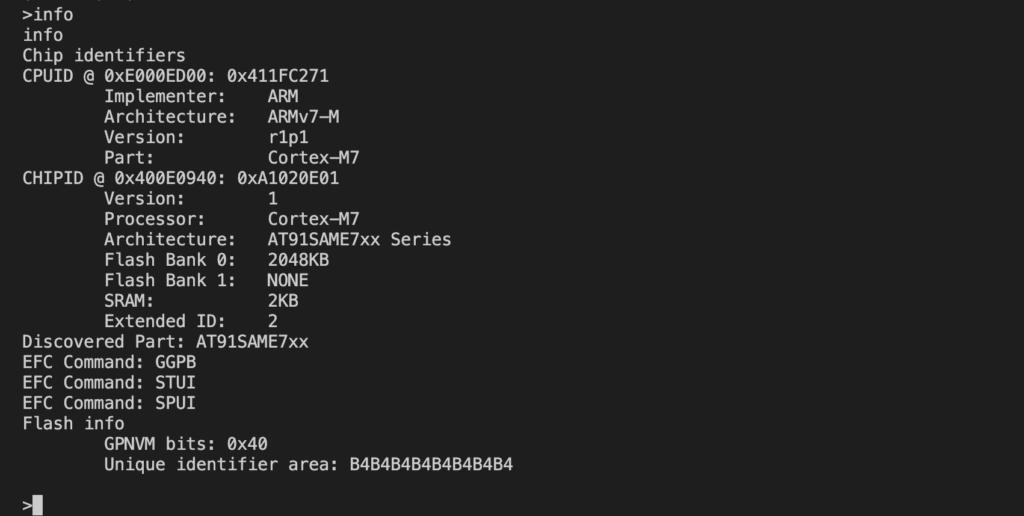
- Info command
Screenshots using Terminal mode:
- Read the ROM version

- Read the first word at address 0x800000

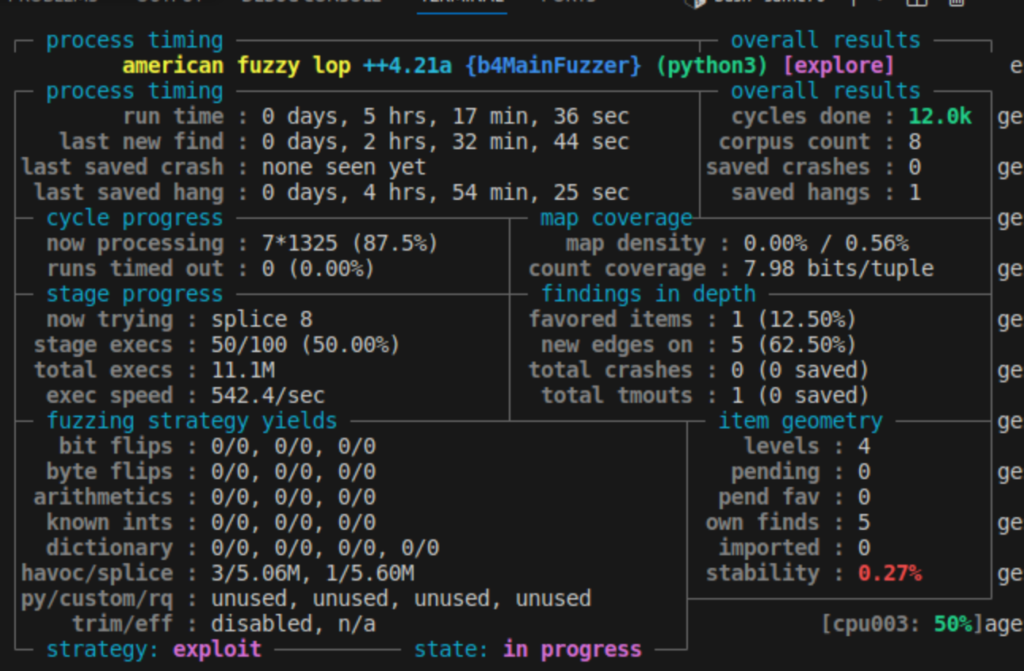
Fuzzing
Steps:
1- cd qiling/examples/fuzzing/same70
2- before run bsah fuzz.sh (open fuzz.sh and change python path to the one that having Qiling)
3- bsah fuzz.sh
We found that the fuzzing process was significantly faster on a Linux VM compared to macOS.
- Macos
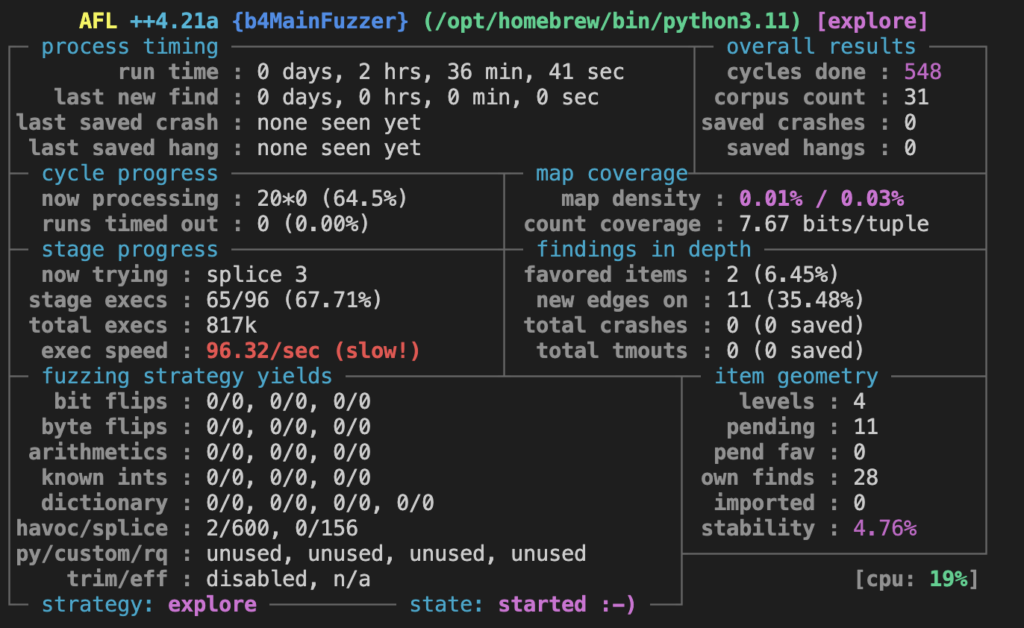
- Linux VM
Conclusion
Through this exploration, I gained a deeper understanding of the SAM MCU’s security features and the complexities of emulating ROM code. While the documentation provided by Atmel is thorough, certain areas like the Security Bit Protection required more hands-on investigation. The Qiling Project, despite its initial lack of documentation, proved to be a valuable tool for emulating and understanding the MCU’s behavior. This journey not only enhanced my knowledge but also highlighted the importance of practical experimentation in embedded systems development.
Feel free to tweak any part further to better match your style or to add any specific details you think are important.
